
A Practical Guide to Object Detection using the YOLO Framework in Python
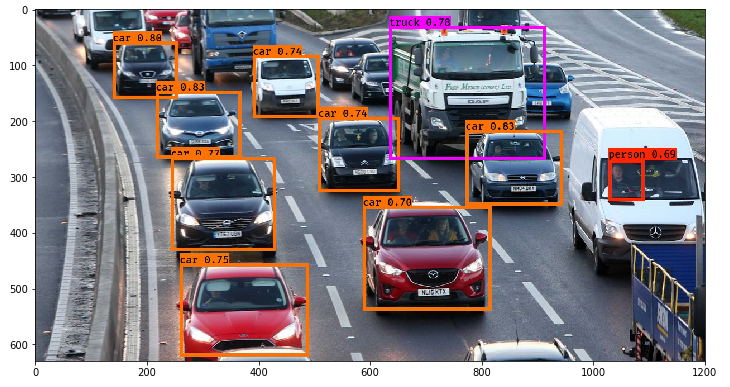
Introduction
Object detection is a fundamental task in computer vision that involves identifying and localizing objects of interest within an image. It has numerous real-world applications, from autonomous vehicles and surveillance systems to medical image analysis and robotics. Over the years, various object detection frameworks have been proposed, but one that stands out for its speed and accuracy is YOLO (You Only Look Once).
YOLO has revolutionized the field of object detection with its simple yet effective approach. Unlike earlier methods that relied on region proposal networks and multi-stage processing, YOLO treats object detection as a regression problem. It divides the input image into a grid and predicts bounding boxes and class probabilities directly, all in a single forward pass of a convolutional neural network (CNN). This unified architecture enables YOLO to achieve real-time performance while maintaining high accuracy.
In this blog post, we will dive into the world of object detection using the YOLO framework. We‘ll explore its evolution, understand its core concepts, and implement it in Python using pre-trained models. Whether you‘re a computer vision enthusiast, a machine learning practitioner, or someone curious about object detection, this guide will provide you with practical insights and hands-on experience.
The Evolution of YOLO
Since its introduction in 2016, YOLO has undergone several iterations, each bringing significant improvements in terms of accuracy, speed, and flexibility. Let‘s take a brief look at the major versions of YOLO:
-
YOLOv1: The original YOLO paper introduced the concept of treating object detection as a regression problem. It divided the image into a 7×7 grid and predicted bounding boxes and class probabilities for each grid cell. YOLOv1 achieved real-time performance but had limitations in detecting small objects and handling complex scenes.
-
YOLOv2: Also known as YOLO9000, YOLOv2 addressed the limitations of YOLOv1. It introduced anchor boxes to handle objects of different shapes and sizes, and utilized batch normalization and higher resolution input images for improved accuracy. YOLOv2 also introduced a more efficient backbone network called Darknet-19.
-
YOLOv3: Released in 2018, YOLOv3 further improved upon YOLOv2. It used a deeper backbone network called Darknet-53 and made predictions at three different scales to better detect objects of varying sizes. YOLOv3 also replaced softmax with independent logistic classifiers for multi-label classification.
-
YOLOv4: Published in 2020, YOLOv4 aimed to strike a balance between speed and accuracy. It introduced several architectural tweaks and training techniques, such as Mosaic data augmentation, self-adversarial training, and cross-stage partial connections (CSP). YOLOv4 achieved state-of-the-art performance on the COCO dataset.
-
YOLOv5 and beyond: Developed by Ultralytics, YOLOv5 is a PyTorch-based implementation that offers a range of models with different sizes and performance trade-offs. It incorporates features like anchor-free detection, mosaic data augmentation, and advanced loss functions. Subsequent versions like YOLOv6 and YOLOv7 continue to push the boundaries of object detection.
Understanding the YOLO Approach
At its core, YOLO treats object detection as a regression problem. Instead of using complex pipelines with region proposals and post-processing steps, YOLO directly predicts bounding boxes and class probabilities in a single forward pass.
Here‘s a high-level overview of how YOLO works:
-
Grid division: YOLO divides the input image into a grid of fixed size (e.g., 13×13 or 19×19). Each grid cell is responsible for detecting objects whose center falls within that cell.
-
Bounding box prediction: For each grid cell, YOLO predicts a fixed number of bounding boxes (e.g., 5). Each bounding box is represented by its center coordinates (x, y), width (w), height (h), and a confidence score. The confidence score represents the model‘s certainty that an object exists within that bounding box.
-
Class probability prediction: In addition to bounding boxes, YOLO also predicts class probabilities for each grid cell. It assigns a probability score to each class, indicating the likelihood of that class being present in the grid cell.
-
Anchor boxes: To handle objects of different shapes and sizes, YOLO uses anchor boxes. Anchor boxes are pre-defined bounding box shapes that the model learns to adjust during training. Each bounding box prediction is associated with an anchor box, allowing YOLO to specialize in detecting objects of certain shapes.
-
Non-max suppression: Since YOLO predicts multiple bounding boxes per grid cell, there may be overlapping detections for the same object. Non-max suppression is applied to remove redundant detections and keep only the bounding box with the highest confidence score for each object.
-
Inference: During inference, YOLO takes an input image and passes it through the CNN. The network outputs the predicted bounding boxes, confidence scores, and class probabilities for each grid cell. These predictions are then post-processed to obtain the final detections.
Key Concepts in YOLO
To fully grasp the workings of YOLO, let‘s explore some key concepts:
-
Intersection over Union (IoU): IoU is a metric used to evaluate the overlap between two bounding boxes. It is calculated as the area of intersection divided by the area of union. IoU is used during training to compare the predicted bounding boxes with the ground truth annotations and optimize the model‘s performance.
-
Anchor boxes: Anchor boxes are pre-defined bounding box shapes that the model learns to adjust. They help YOLO handle objects of different sizes and aspect ratios. During training, each predicted bounding box is assigned to the anchor box that has the highest IoU with the ground truth bounding box.
-
Non-max suppression: Non-max suppression is a post-processing step that removes redundant detections. It selects the bounding box with the highest confidence score and suppresses other overlapping bounding boxes with lower confidence scores. This helps in obtaining a single detection per object.
-
Confidence threshold: YOLO assigns a confidence score to each predicted bounding box, indicating the model‘s certainty about the presence of an object. A confidence threshold is used to filter out low-confidence detections. Bounding boxes with confidence scores below the threshold are discarded.
-
Class probability threshold: In addition to the confidence threshold, YOLO also uses a class probability threshold to determine the final class labels for the detected objects. If the class probability for a particular class exceeds the threshold, that class is assigned to the object.
Implementing YOLO in Python
Now that we have a solid understanding of YOLO‘s approach and key concepts, let‘s dive into implementing it in Python. We‘ll use a pre-trained YOLO model to detect objects in images.
Step 1: Set up the environment
First, make sure you have Python installed on your system. We‘ll also need the following libraries:
- NumPy
- OpenCV
- Matplotlib
You can install them using pip:
pip install numpy opencv-python matplotlibStep 2: Download the pre-trained YOLO model
For this example, we‘ll use the YOLOv3 model trained on the COCO dataset. Download the following files:
yolov3.cfg: The YOLO configuration fileyolov3.weights: The pre-trained weightscoco.names: The class names for the COCO dataset
Place these files in the same directory as your Python script.
Step 3: Load the YOLO model
import cv2
import numpy as np

# Load the YOLO model
net = cv2.dnn.readNetFromDarknet("yolov3.cfg", "yolov3.weights")
classes = []

# Load the class names
with open("coco.names", "r") as f:
    classes = [line.strip() for line in f.readlines()]

layer_names = net.getLayerNames()
output_layers = [layer_names[i[0] - 1] for i in net.getUnconnectedOutLayers()]
Step 4: Load and preprocess the input image
# Load the input image
img = cv2.imread("input_image.jpg")
height, width, _ = img.shape

# Create a blob from the image
blob = cv2.dnn.blobFromImage(img, 1/255.0, (416, 416), swapRB=True, crop=False)
Step 5: Perform object detection
# Set the input for the YOLO model
net.setInput(blob)

# Run forward pass and get the detections
outs = net.forward(output_layers)
Step 6: Process the detections
# Process the detections
boxes = []
confidences = []
class_ids = []

for out in outs:
    for detection in out:
        scores = detection[5:]
        class_id = np.argmax(scores)
        confidence = scores[class_id]
        if confidence > 0.5:
            center_x = int(detection[0] * width)
            center_y = int(detection[1] * height)
            w = int(detection[2] * width)
            h = int(detection[3] * height)
            x = int(center_x - w / 2)
            y = int(center_y - h / 2)
            boxes.append([x, y, w, h])
            confidences.append(float(confidence))
            class_ids.append(class_id)

# Apply non-max suppression
indices = cv2.dnn.NMSBoxes(boxes, confidences, 0.5, 0.4)
Step 7: Visualize the detections
# Draw the bounding boxes and class labels on the image
for i in indices:
    i = i[0]
    box = boxes[i]
    x, y, w, h = box
    label = str(classes[class_ids[i]])
    color = (0, 255, 0)
    cv2.rectangle(img, (x, y), (x + w, y + h), color, 2)
    cv2.putText(img, label, (x, y - 5), cv2.FONT_HERSHEY_SIMPLEX, 0.5, color, 2)

# Display the output image
cv2.imshow("Object Detection", img)
cv2.waitKey(0)
cv2.destroyAllWindows()
And there you have it! You‘ve successfully implemented object detection using the YOLO framework in Python. You can now use this script to detect objects in any input image by replacing "input_image.jpg" with the path to your desired image.
Applications and Future of YOLO
Object detection has numerous applications across various domains. YOLO‘s real-time performance and high accuracy make it particularly suitable for:
-
Autonomous vehicles: YOLO can be used to detect pedestrians, vehicles, traffic signs, and obstacles in real-time, enabling safer navigation for self-driving cars.
-
Surveillance systems: YOLO can analyze video feeds from security cameras to detect and track objects of interest, such as people or suspicious activities.
-
Robotics: YOLO enables robots to perceive and interact with their environment by detecting and localizing objects in real-time.
-
Medical image analysis: YOLO can assist in detecting anomalies, lesions, or specific anatomical structures in medical images, aiding in diagnosis and treatment planning.
-
Retail and inventory management: YOLO can be used to monitor stock levels, detect misplaced items, and optimize shelf space in retail stores.
As the field of object detection continues to evolve, YOLO remains at the forefront of research and development. Newer versions of YOLO, such as YOLOv5 and beyond, aim to further improve accuracy, speed, and ease of use. Additionally, techniques like transfer learning and domain adaptation enable YOLO to be applied to specific domains with limited annotated data.
Moreover, the integration of YOLO with other computer vision tasks, such as instance segmentation and pose estimation, opens up new possibilities for more comprehensive scene understanding. With the increasing availability of powerful hardware and optimized implementations, YOLO is poised to play a crucial role in real-world applications that require fast and accurate object detection.
Conclusion
In this blog post, we explored the YOLO framework for object detection. We began by understanding the motivation behind YOLO and its evolution through different versions. We delved into the core concepts of YOLO, including its grid-based approach, bounding box prediction, and key techniques like anchor boxes and non-max suppression.
We then walked through a step-by-step implementation of YOLO in Python using a pre-trained model. By following the code examples, you can now apply YOLO to detect objects in your own images and extend it to various applications.
Object detection with YOLO has the potential to revolutionize industries and solve real-world problems. As the field advances, YOLO will continue to be a valuable tool in the computer vision toolbox, enabling developers and researchers to build intelligent systems that can perceive and understand the world around us.
So go ahead, experiment with YOLO, and unleash the power of real-time object detection in your projects. Happy detecting!


