Real-Time Human Pose Estimation with PoseNet and Deep Learning
Human pose estimation is a rapidly advancing subfield of computer vision that focuses on detecting and tracking the position and orientation of the human body from images or video. Powered by deep learning, cutting-edge pose estimation models can now detect body keypoints like elbows, shoulders, and knees with impressive speed and accuracy.
One of the most popular and accessible frameworks for pose estimation is PoseNet, a pre-trained deep learning model that can be run in the browser with TensorFlow.js. In this in-depth guide, we‘ll explore what PoseNet is, how it works under the hood, and walk through building real-time pose detection web apps with PoseNet and ml5.js. Whether you‘re totally new to pose estimation or looking to level up your knowledge, this article will equip you with a solid foundation.
Understanding PoseNet
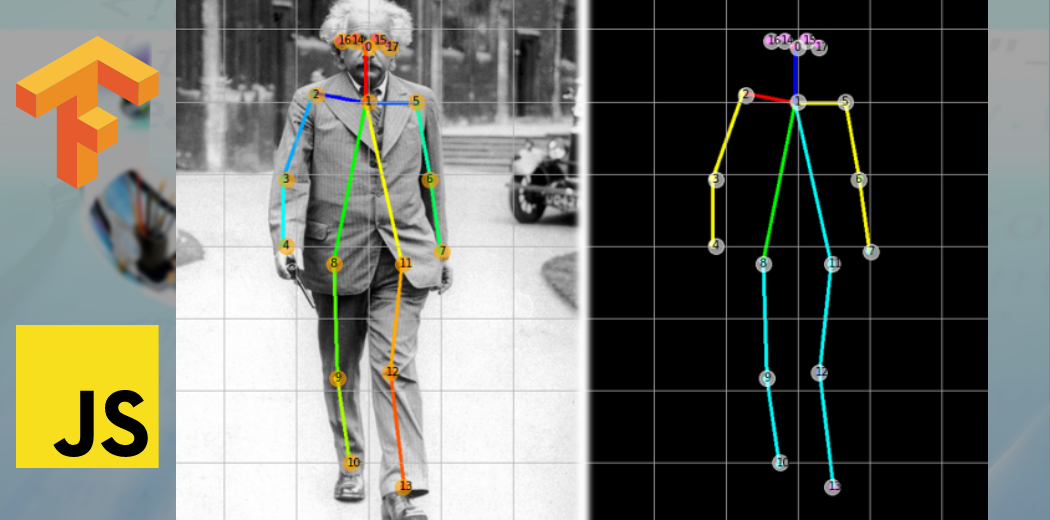
First released by Google in 2018, PoseNet is a machine learning model that estimates human pose by detecting body keypoints from RGB images. The model outputs the 2D locations of keypoints like eyes, ears, elbows, knees, and ankles. By connecting these keypoints, we can visualize the full pose skeleton.

PoseNet detects 17 keypoints in total:
- 5 facial keypoints (nose, eyes, ears)
- 12 body keypoints (shoulders, elbows, wrists, hips, knees, ankles)
Each keypoint is represented by an x and y pixel coordinate in the source image along with a confidence score between 0.0 and 1.0 indicating how sure the model is about that particular point‘s location.
PoseNet can be used in two modes:
- Single-person pose estimation
- Multi-person pose estimation
In single-pose mode, PoseNet assumes there is only one subject in the image and will output the single most confident pose it detects. In multi-pose mode, it can detect multiple poses simultaneously, up to a configurable maximum number of poses.
PoseNet Architecture
Under the hood, PoseNet uses a convolutional neural network (CNN) architecture called MobileNet which is designed for efficient inference on mobile and embedded devices. MobileNet achieves a good balance between accuracy and speed by using depthwise separable convolutions to reduce the model parameters and computational cost.
The MobileNet backbone network is followed by a series of deconvolutional layers that upsample the feature maps to a higher resolution, enabling precise localization of keypoints. There are separate output heads for heatmaps, which encode the keypoint locations, and offset vectors, which refine the keypoint positions.
Here‘s a simplified diagram of the PoseNet model architecture:

PoseNet comes in multi-person and single-person variants as well as different input resolutions (161, 193, 257, 353, etc.) that offer tradeoffs between accuracy and inference speed. The official PoseNet models are pre-trained on real-world and synthetic images of people in a variety of poses, activities, and backgrounds.
Estimating Poses with PoseNet
Now that we have a high-level understanding of what PoseNet is and how it works, let‘s dive into the technical details of using PoseNet to detect poses in real-time web apps.
We‘ll be working with the ml5.js library, which provides a beginner-friendly JavaScript interface to PoseNet and other machine learning models. Under the hood, ml5.js uses TensorFlow.js to run the pre-trained PoseNet model directly in the browser.
Here are the key steps to get started with PoseNet in ml5.js:
- Load the ml5.js and p5.js libraries in an HTML file
- Create a canvas to display the video and pose skeleton
- Access a webcam stream using
createCapture - Load the PoseNet model with
ml5.poseNet - Detect poses on each video frame using
posenet.on - Process the pose keypoints and skeleton data
- Visualize keypoints and skeletons on the canvas
Let‘s walk through each step in detail with code examples.
1. Load Libraries
In your HTML file, add script tags to load the p5.js and ml5.js libraries:
<script src="https://cdnjs.cloudflare.com/ajax/libs/p5.js/1.4.0/p5.js"></script>
<script src="https://unpkg.com/ml5@latest/dist/ml5.min.js"></script>
2. Create Canvas
Next, set up a canvas to display the webcam feed and pose visualization:
let video;
let poseNet;
let poses = [];

function setup() {
  createCanvas(640, 480);
  video = createCapture(VIDEO);
  video.size(width, height);

  // Create a new poseNet method
  poseNet = ml5.poseNet(video, modelReady);
  // When the model is loaded
  function modelReady() {
    console.log(‘Model Loaded‘);
  }

  // Hide the video element, and just show the canvas
  video.hide();
}
This creates a 640×480 canvas and accesses the user‘s webcam with createCapture. We then load the PoseNet model, specifying the video as input. The modelReady function will be called once the model is loaded and ready for inference.
3. Detect Poses
To detect poses on each video frame, we register a callback function using posenet.on that will receive an array of poses:
// Listen to new ‘pose‘ events
poseNet.on(‘pose‘, function(results) {
  poses = results;
});
Now the poses variable will be updated on each frame with an array of detected poses, where each pose contains keypoint data.
4. Visualize Keypoints and Skeleton
Finally, we visualize the detected keypoints and skeleton on the canvas by iterating through the pose data:
function draw() {
  image(video, 0, 0, width, height);

  // For each pose detected...
  for (let i = 0; i < poses.length; i++) {
    const pose = poses[i].pose;

    // Draw keypoints
    for (let j = 0; j < pose.keypoints.length; j++) {
      const keypoint = pose.keypoints[j];
      fill(255, 0, 0);
      noStroke();
      ellipse(keypoint.position.x, keypoint.position.y, 10, 10);
    }

    // Draw skeleton
    for (let j = 0; j < pose.skeleton.length; j++) {
      const partA = pose.skeleton[j][0];
      const partB = pose.skeleton[j][1];
      stroke(255, 0, 0);
      line(partA.position.x, partA.position.y, partB.position.x, partB.position.y);
    }
  }
}
We first draw the current video frame to the canvas. Then for each detected pose, we draw red ellipses at each keypoint location and red lines connecting the keypoints to form the pose skeleton.
And that‘s it! With just a few dozen lines of code, we have a working real-time pose estimation app powered by PoseNet. The complete code is available here:
For multi-person pose detection, the process is very similar. The key difference is that poses will be an array containing data for multiple detected people. Here‘s the complete code for multi-pose estimation:
Real-World Applications
Pose estimation has a wide range of exciting real-world applications across domains like fitness, healthcare, entertainment, and robotics. Here are a few examples:
- Virtual fitness coaches that provide real-time feedback on exercise form and posture
- Interactive installations that allow people to control music, visuals or games with body movements
- Augmented reality filters and effects that track facial expressions and body pose
- Gesture recognition systems for controlling devices and interfaces
- Ergonomics analysis to assess workplace posture and prevent strain injuries
- Markerless motion capture for 3D character animation
- Robots that can perceive and interact safely with humans
As pose estimation technology continues to improve in accuracy and efficiency, we can expect to see even more innovative uses emerge in the coming years. Accessible tools like PoseNet and TensorFlow.js are also empowering a new wave of creative developers to experiment with body-based interfaces and experiences.
Conclusion
In this deep dive on pose estimation with PoseNet, we‘ve covered a lot of ground – from the high-level concepts behind pose detection to the nitty gritty of implementing a real-time PoseNet application with ml5.js and TensorFlow.js.
The key points to remember are:
- PoseNet is a pre-trained deep learning model for 2D human pose estimation from RGB images
- It uses the MobileNet convolutional architecture for efficient inference in the browser
- PoseNet detects the locations of 17 body keypoints like eyes, shoulders, elbows, and knees
- ml5.js provides an easy-to-use interface to run PoseNet in JavaScript with a few lines of code
- Detected poses can be visualized by drawing the keypoints and skeleton to an HTML canvas
- PoseNet enables a variety of pose tracking applications in fitness, gaming, robotics, and beyond
I encourage you to try out the code examples from this article and experiment with adding your own ideas and features. There are many exciting possibilities to explore, such as:
- Classifying yoga/dance poses or exercises based on keypoint angles
- Triggering animations or sounds based on gesture detection
- Applying computer vision techniques to track objects together with poses
- Combining pose data with other sensor inputs like accelerometer or depth cameras
- Porting PoseNet to other platforms like Node.js or React Native
To learn more about pose estimation and find inspiration for your own projects, check out these resources:
- Real-time Human Pose Estimation in the Browser with TensorFlow.js
- ml5.js Pose Estimation Examples
- TensorFlow Pose Estimation Guide
- Awesome Human Pose Estimation
- Posenet-Pose Animator
As you can see, pose estimation is a fascinating area with tons of room for innovation. While it may seem like magic, the core ideas are actually quite intuitive and the tools to get started are more accessible than ever. So what are you waiting for? Go forth and boldly build the pose-powered projects of your dreams!